Showing posts with label Crafts. Show all posts

Tuesday, July 3, 2012

My baby is ONE!

We had a circus themed party for my baby and it turned out to be a lot of fun!! We had pizza and swimming and sno cones and balloon animals and a blast watching him dig into his cake and then wash off in a bubble bath after! I know that time always seems to fly by, but this year seemed to go by faster than normal. I am so grateful for my baby and was glad we were able to celebrate his birthday!!!

Thursday, June 28, 2012

Cake Banner

My husband's baby sister got married a couple of weeks ago...the last sibling in both our families to get married! Crazy, we could possibly all be having kiddos together, even though there is a large age span across both of our fams! I am soooo happy for her and it was so fun to help with the reception! I need to track down more pics of all of her wedding details...but everything was PERFECT!!! I did attempt my first lil' cake banner to put on the top of her cake and think/hope it turned out cute! It matched the one her mama made that hung in front on the table! I also used my handy dandy cricut to cut out their initials for the front of the cake! The cake itself was amazing---my talented sis-in-law, Heidi made it and did an incredible job! More pics/fun details of their day to come!!! Congrats Aimee and Sam!!!

Wednesday, February 1, 2012

String Art

Have you seen this string art floating around pinterest??
My friend is redoing her master bedroom and we were trying to come up with something cute for above her bed.  She showed me this picture and I got to work! You can go to Que Linda for her tutorial, because I just followed that and she explains everything great!  I ran to Lowe's and found this wood with grooves so they fit together and thought that I would like the look and it might help hold everything together...I poured wood glue in the grooves and stuck them together and gave the a LIGHT COAT of white paint...

the only difference from her tutorial, I "free handed" the word, because I didn't feel like busting out my Cricut. You can tell I obviously just chicken scratched until I liked it:)


Then I cut it out, trying to keep the thickness the same for all of the letters. Then I started nailing and when I was done, I pulled the paper off and was left with a bunch of nails!
(my little helper's hands finishing his cereal in the background;)
I went to the store to buy yarn and then opted for crochet thread, since it was thinner. I'm glad I did, because I like the end result better. 

I secured the back by nailing 2 vertical boards  onto my original 4 planks of wood and hung a wire across the back...

It wasn't too hard and I'm excited to see it hanging above Mandy's bed!
If you try it, let me know! I'd love to post it on my blog!

Wednesday, November 30, 2011

Thankful Board


I have had these boards sitting around for over a year, I bought them at Michael's during 90% off after Halloween Clearance. I needed something to take my girlies for visiting teaching for Thanksgiving & these boards came to mind.

I printed up the scripture D&C 59:7
"Thou shalt thank the Lord thy God in all things"

I sanded the board a bit, trying to make it look more aged & used my cricut software(MAKE THE CUT---can be purchased on my sidebar) to cut it out in cream vinyl...
Easy Peasy! Hopefully my girls enjoyed a little Thanksgiving decor!

Tuesday, December 21, 2010

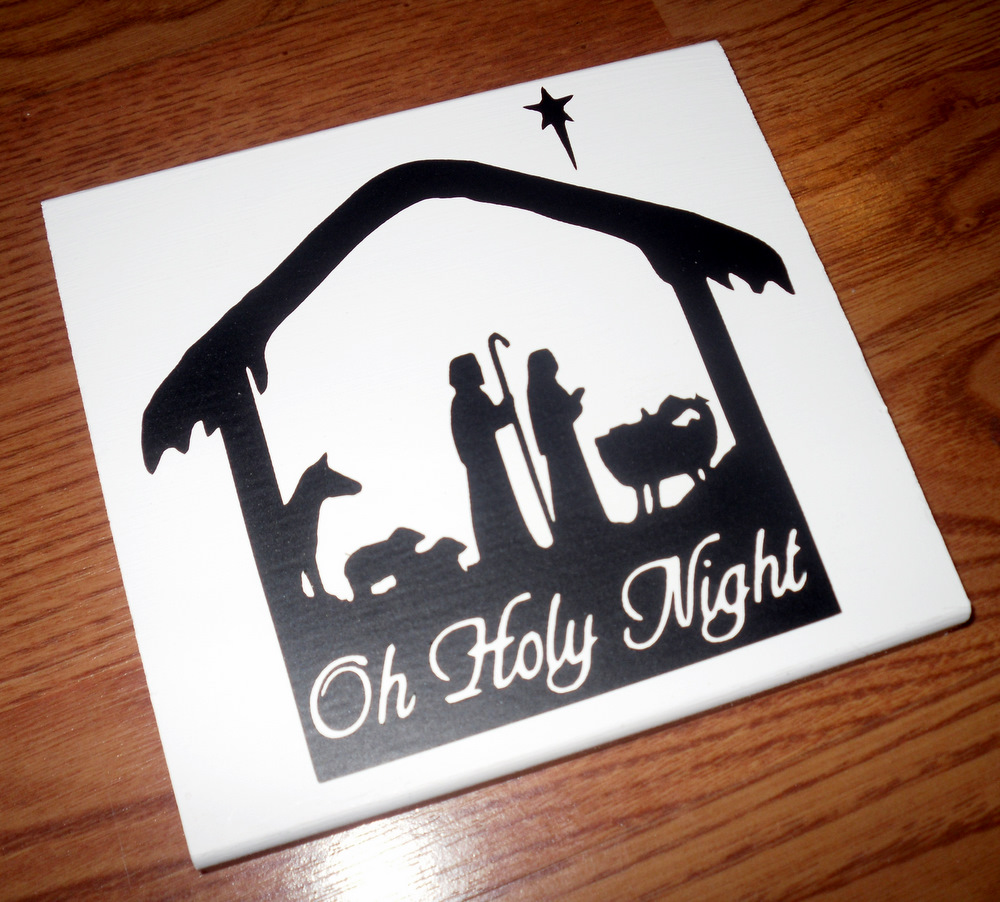
Oh Holy Night

I made this SUPER EASY gift, 
using some scrap wood in my garage, a can of white spray paint & black vinyl.

I googled something like "Nativity Templates" and came across this image that I LOVED & just saved it to my computer & then IMPORTED it right into Make The Cut!
If you own a Cricut, Gazelle, Sillhouette or Robo & you don't have this software...GET IT!
I'm serious, you will be in LOVE...and it is a GREAT PRICE, order through me by CLICKING HERE!

 I toyed with the idea of drilling holes & putting a wire or ribbon across the top to hang it, but decided I liked it as is. I think I will go to the Dollare Store or Walmart and see if I can dig up some tiny easels to give with this holiday decor, but they do stand on their own.
I started wrapping them in cellophane & ran out & then decided they looked cute with just a bow tied around them...
They are SO CUTE & EASY & your neighbors don't have to know you spent less than $1 on them...shhhh!


Friday, November 5, 2010

Lolly Jane Craft Night


The talented TWIN SISTERS over at Lolly Jane, hosted a Craft Night & my sis-in-law, Julie & I decided to go!


We both decided to make the "Give Thanks & Eat" Boards...to add to our Thanksgiving decor, 
but I'll let you in on a little secret(we both plan to keep them up year round in our kitchens!) 


I did mine on a 12x15 piece of wood & distressed it a bunch. I painted it brown first & painted my lettering in cream. 
Julie's is on a 16x20 Canvas & I LOVE how it turned out! 
She painted the canvas creme & then added a brown Ralph Lauren Glaze & painted the lettering chocolate brown, using the vinyl stencil & it looks great! 
I might copy Julie and do one on canvas to put in my kitchen year round & keep my smaller one with my Thanksgiving decor...


Want to make one for yourself? 
Stop by Lolly Jane's ETSY shop & order today!
Happy Friday!
I have a HOT date scheduled with my husband & I can't wait!


Photobucket

Wednesday, October 6, 2010

Spooky Wreaths

I've seen several Tulle Halloween Wreaths around & I think they are SO CUTE 
(and spooky, of course!)


Check out this one at Between U & Me
I love the orange polka dot ribbon in hers!!!


Or this one at Naptime Journal!


Flamingo Toes added some Hot Pink to hers!

I decided to make one & tried to keep the costs LOW!
I went to Walmart & picked up black tulle fabric...I bought 2 yards & $1.27/yd & some orange ribbon that was $1.99, but I only used 1/4 of it. 
I tried to find a metal wreath wring, but they didn't have any & my mom came up with the brilliant idea to go get a wire hanger out of the closet, which I was definitely on board with because it was FREE!
So for about $3.50, I came up with this...
It is simple enough, but if you want to make your own, go grab a wire hanger from the back of your closet & bend it into a circle, twisting the ends for extra strength...


 I cut my strips of fabric about 18"  & then folded them in half and looped them through, so that they stood out about 9" from the metal ring. You don't have to knot these, loop them as if you were making a tutu.
Tie your orange ribbon on one end of your wreath, hang and enjoy!
Oh...and see if you can dig through your children's toys and come up with some spiders;)
I only came up with one orange one, but I love what it adds!


Now go & buy some Tulle & make something CUTE for your front door!!!


Photobucket

Saturday, September 25, 2010

Ally's Attic Fall Decor

My sis/sis-in-laws/mom had a Craft Night last week
(we are going to attempt to do this more often!)
& I wanted to show the results of our night! All of our wood was ordered directly through 
check it out...she has some CUTE CUTE stuff!
We ordered all our wood unfinished & then each of painted the day/night away, taking our own spin on the things we saw on Ally's website & they all turned out great!

My sis-in-law Amy's HARVEST Blocks...
I LOVE the colors of paint she used!
and she made this cute Frame that night too & had me cut out Spooky in black vinyl! She plans to make a different page for several different holidays & then she can just switch it out, VERY clever!
My sis-in-law, Julie made Harvest blocks as well(I think she made 5 sets to give away as gifts!)
& I love how she embellished one block with scrapbook paper...
And then because she is a SMARTIE PANTS, she had me cut vinyl for the opposite side & then painted them Christmas-y colors & now they work for 2 holidays! The Harvest blocks came with the cute pumpkin & then she found this adorable Santa on Ally's Attic & painted them to coordinate with the Believe Blocks. 
The recipients of these ADORABLE double sided blocks are going to be very happy Julie!
She also painted these WITCH letters & they turned out SO GOOD! The Glitter was HER IDEA & I think it makes them a million times cuter!

My projects included this Thanksgiving Turkey, which I plan to hang on my front door!
I decided to add scrapbook paper to the feathers & like how it turned out...
and I also made the Witch Letters!
I just LOVE the detail that Ally does in these letters, the witch & the cat are so stinkin' adorable...
It was such a FUN night & I can't wait to add these to my Holiday Decor!

Check out Ally's Attic...a GREAT PLACE to order Cute Wood Decor!


Linking up to the FALL DECOR LINKY PARTY over at The Idea Room


Photobucket

Thursday, August 19, 2010

Ribbon Bead Necklace

Check out this necklace tutorial at
A Girl and a Glue Gun

I LOVEEEE it!
I knew the second I saw it, I wanted to feature it & I can't wait to make one for myself!

Photobucket

Wednesday, August 11, 2010

Musical Dice

All of you Cricut owners or want-to-be Cricut owners, 
listen up!

I have had my Cricut for almost a year & have used it quite a bit!
BUT...those cartridges are SO EXPENSIVE!
I have avoided buying cartridges, usually borrowing the fonts/designs I need from friends, but I recently decided to do some research on software. 

I ALMOST bought Sure Cuts a Lot, but after researching, discovered 
Make The Cut 
would be a better option for me!
And so I purchased...
and it did NOT disappoint.
I LOVE, LOVE, LOVE it!


Here is a quick little
HOW TO, JUST FOR YOU...
using my new software!
(which by the way, cost as much as 1-2 cartridges)

I wanted to make 
"SONG DICE" for my preschool class.
Essentially...blocks of wood that they can ROLL & it will decide what SONGS we sing during music time!

I opened up my MAKE THE CUT program & just searched the MTC Gallery for pictures to coordinate with kid songs. It is REALLY SIMPLE...just click IMPORT...MTC GALLERY & type in whatever you want & I almost always found what I was looking for! You can also import ANY image from your computer, or a pic you googled,etc...but I was trying to do this QUICKLY...aka...before my son's nap was over!

I wanted to do TWO dice, so I needed TWELVE songs total & I easily laid out all 12 on my "12x12 virtual mat" using my Make the Cut program!
Then I pushed CUT!
Those of you who use Cricut cartridges, know that I would have had to cut each word & picture INDIVIDUALLY...so being able to LAY OUT THE ENTIRE PAGE & then click CUT saved me SOOO MUCH TIME!!!

While the cricut was doing it's work, I went to work with some of my own cutting...

I needed 3" squares for my blocks & I used bright, fun colors, since they will be for Preschool!
Don't mind the raw edges, I need a new paper cutter...bad!
Next, Mod Podge your squares onto your blocks...
and take a pic before your flatten out all of the wrinkles;) 
oh wait...don't do that, unless you are me!
*There are 4 blocks, because I decided to make a duplicate set for our Church Nursery, since I oversee them!
Go check on your vinyl...
realize that the words you were printing were SUPER SMALL & the vinyl got eaten up in some areas
(No fault of Cricut or Make the Cut, just can't do super small letters in vinyl)
But, I decided the pictures were cute by themselves & as long as I know the songs, it shouldn't matter that the song titles are not there!
AND... they are ready to roll!
 Super Easy! Right?
I can see so many options with this simple craft...
Chore dice
Boredom dice
Family Night dice

Let me know if you use a Cricut & have software or are looking into it!
I would love to answer any questions, 
although I am still just a beginner!

Now...I'm off to write Make The Cut, because they should pay me for this amazing advertising, huh!? haha!
***updated:
I wrote them & am now a Make The Cut affiliate! If you want to order the software, please do so by clicking the button on MY sidebar! I'll love you forever!
 I'm kidding, but here is something I am very serious about...
 
Want the supplies to make these???
Click HERE to comment & the supplies might just end up on your doorstep shortly!

*check out my sidebar for all of the fun parties I'm linking to!


Photobucket