Recently, I received this comment from one of my best friend's April...
question- have you ever seen modge-podged pumpkins? just wondering if you could maybe do a post on those and maybe a little tutorial. :) basically, i want to modge podge some cute paper on to my pumpkins this fall but i am not crafty and so maybe you could help??? you are awesome!
Well April...
No, I have not ever seen modge podged pumpkins.
Tutorial....hmmm....Sure.
Where to begin???
Google of course.
I googled "Modge Podged Pumpkins"-Nothing
I googled "Scrapbook Paper Pumpkins"-Still found nothing
I decided to just go for it.
I had nothing to lose.
and PS...you ARE crafty April!
Step One:
Purchase supplies or dig through your closet {like me} and find FREE supplies:)
1 Pumpkin
(I used the backside of a jack-o-lantern that my mother-in-law gave Parker this week)
Scrapbook Paper
Mod Podge
Paint brush
Scissors

Step Two:
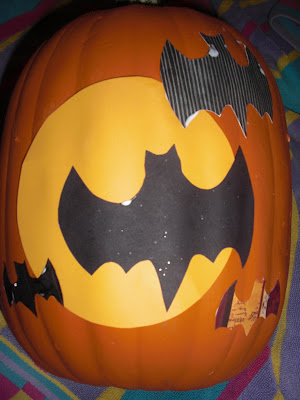
Cut out any design you'd like...Get Creative!
I chose a simple moon & bats...because...
well, because they were SIMPLE:)

 Step Four:
Now apply a layer of Mod Podge over the top of your paper
Let Dry.
 Step Five:
Decide your pumpkin needs more color.
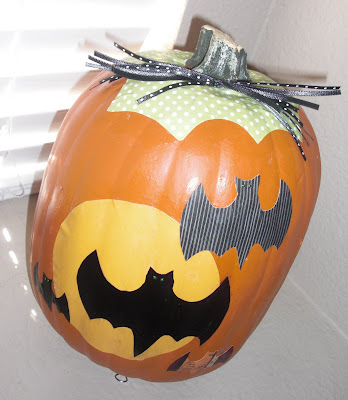
Cut green polka dotted paper with hole in the middle.

Step Six:
Dig through closet again & find the only black ribbon you have & add a little embellishment

Step Seven:
Add green glitter eyes to bat, to tie in green leaves...
who cares if bats don't really have green eyes!

April...
I have NO IDEA WHAT you had in mind, but this is the tutorial I came up with!
I hope it helps.
I also don't know if you were wanting to do this on real or fake pumpkins, but I don't think it would matter either way.
There are a lot of options you could do with this...so many different colors, designs & embellishments you could add!
I am going to do a black & white polka dotted one next...just because I think it would be cute.
Start to Finish this project took about 20 minutes...including drying time, so it wasn't bad at all. Perfect craft while your kids nap:)
I'd love to see what any of you(especially YOU, April) come up with for your pumpkins!


5 comments :
stace! that is so cute!! see what i mean, you can make something out of nothing! i have to have a picture, a tutorial, SOMETHING to give me an idea. anyway, i should have told you where i saw the idea. i saw it on michaels.com. i clicked on the tab "seasons and celebrations" and then i clicked on "halloween." the modge-podged pumpkins are on page 9, i think. your tutorial was MUY helpful and gave me a couple new ideas for my fall decor. thanks stace!
and just so you don't think i'm crazy, there are some instructions on michaels.com, but i've never used modge podge before so i needed a more detailed tutorial and that's exactly what you did. so thanks!
I've got some funkins to just waiting to be fancied up!
Just saw this over at Sisters Stuff! You're getting around--in a good way, of course!
I love your blog, and I hadn't thought of Mod Podging a pumpkin! Gives me a great idea for my son's birthday party--his b-day is Halloween and I was wondering how I was going to paint Rocket from Little Einsteins on a pumpkin--Mod Podge a much better idea.
Post a Comment