Showing posts with label Make The Cut. Show all posts

Tuesday, March 12, 2013

All You Need Is Love

Awhile back I made some gray and white signs for my bedroom...but about a month ago, I gave them to my brother/sis-in-law for their house...so we have had an empty space on our shelf for a few weeks. Today, I dug out some cupboard doors and made some new signs for the space and decided to incorporate in some yellow this time! AND...I love them!

The pop of color makes me happy:)


Want to order some custom signs for your home?
Email me at craftifyit@gmail.com

For both signs, I cut "stencils" from vinyl using my MAKE THE CUT SOFTWARE--can be purchased on my sidebar!

Thursday, July 26, 2012

Make the Cut Software

I stopped selling MAKE THE CUT software last year, when it no longer was being sold to Cricut customers, but I have recently realized that although it is not compatible with Cricut, it is still compatible with many other machines...including the Silhouette, Cameo and SD, Pazzle, Gazelle, Zing, KNK cutters and ecraft and thought some of you might still be able to benefit from it! The software still works on my cricut, as I purchased before the updates...so my tutorials will still be on a cricut, but hopefully many of you will be able to use and benefit from the Make the Cut Software!
Click on the MAKE THE CUT LOGO above to purchase today! It is normally $79.95 and is on sale today for $58.36...you won't be disappointed!

Monday, December 5, 2011

JINGLE ALL THE WAY


My husband and I went to a Christmas party this past weekend, thrown by my wonderful bro-in-law & sis-in-law(wish I had pictures of it...because it was SOOOOOO CUTE! Every single detail was AMAZING, her house looked like a boutique and the food was delicious!)

We were supposed to bring some gifts for a white elephant gift exchange. 
We brought one cheesy "white elephant" gift & then I decided to make a quick Christmas decor for our other gift. This honestly took me 10 minutes to whip up & I thought it turned out cute!
{I almost kept it for myself}

I scored some FREE cupboard doors awhile back that sit in my shed, until they are needed:)
I pulled one out and gave it a quick coat of RED CRAFT PAINT.
After it dried, I applied the vinyl
(which I actually already had cut out about a year ago & just never did the project)
Then I lightly brushed on a WHITE coat of paint on the edge, letting the red still show through to look make it look a bit aged...
I grabbed a door knob that I had & screwed it into the hole that was already there & pulled an ornament off my tree that I got at the dollar store last year & hung it on the knob...
ALL DONE! 

*I cut my vinyl with using Make the Cut software...which can be purchased on my sidebar

Wednesday, November 30, 2011

Thankful Board


I have had these boards sitting around for over a year, I bought them at Michael's during 90% off after Halloween Clearance. I needed something to take my girlies for visiting teaching for Thanksgiving & these boards came to mind.

I printed up the scripture D&C 59:7
"Thou shalt thank the Lord thy God in all things"

I sanded the board a bit, trying to make it look more aged & used my cricut software(MAKE THE CUT---can be purchased on my sidebar) to cut it out in cream vinyl...
Easy Peasy! Hopefully my girls enjoyed a little Thanksgiving decor!

Friday, July 1, 2011

Love You Still

My sister came by with a couple of boards this week & asked if I could cut her some vinyl for a wedding present for a friend & for a board for her house. 
We designed them in my Cricut Software(MAKE THE CUT-can be purchased on my sidebar!), cut & applied & I think they turned out pretty cute!

Here is the wedding gift for her friend...
and the one we made for her house, she loves this quote & I DO TOO!
I always enjoy an afternoon of CRAFTIFY-ING
...especially with my sister!

Thursday, June 23, 2011

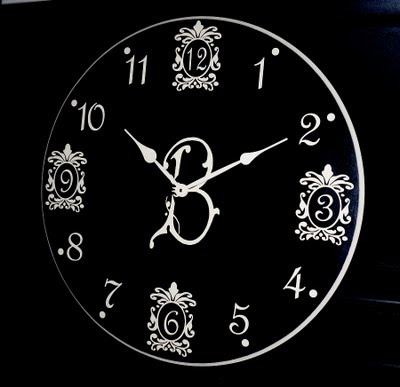
A Clock for Mrs. Brinton

Bride to Be's Request: 
Big Black & Cream Clock with a "B" in the center

Result:
TWO FOOT Black Clock with fun Cream "frame" designs/numbers & swirly B for the middle


Hope you like it Mel..a bridal shower gift for my AMAZING FUTURE SISTER-IN-LAW!!!

clock designed in MAKE THE CUT software, available to purchase on my sidebar!

Saturday, March 19, 2011

IMPORTANT: Cricut Owners Please Read!

If you own the software "Make the Cut"(that I have been LOVING using over the last several months & I always tell you about!) please don't click on the NEW UPDATE when it pops up. It will make your program not work with your cricut machine;( Sadly, Provo Craft put the axe on it & I will be contacting Make the Cut soon to see what this means for those of us that BOUGHT the software, specifically for our cricuts! I'm hoping they will do the right thing & refund your money, but I will let you know as soon as I hear!

I just wanted to let you know for now don't click on that UPDATE!!!
 

Tuesday, March 15, 2011

DIY Laundry Sign

It is SPRING BREAK! 
Wooohooo!

Since we don't have a fun family vacation we are going on, 
I'm trying to be productive this Spring Break & 
do some SPRING CLEANING...

part of which includes giving my laundry room a makeover.
Nothing fancy, because lets be real, 
nobody sees my laundry room but ME. 

Not that I wouldn't LOVEEEE a Laundry Room like this, 
or this...
but realistically I'd rather put my time & money into other rooms in the house. But that is just me.

Oh & the small fact that my laundry room could fit inside the SINK AREA of those laundry rooms;)

I DREAD doing LAUNDRY...it just isn't my thing, but
I'm hoping a little organization will help me in that area!
Today I decided I needed a cute sign on the door & made this up in Picasa... 

then I imported it into my MAKE THE CUT program for my Cricut
NEW UPDATE: This program is not compatible with Cricut:( I'm so sad!!!But it is available with the Silhouette, Gazelle and more!
(Don't have this program???)
I LOVE IT, use it all of the time & have never had to buy a single cartridge!

Anyhow...
I searched in my garage for some wood & came up with this...
 1st I painted it BLACK & then I painted it GREEN...
the same color as my kitchen walls.
Then I distressed it a bit with a sander...
I cut my WORDING out in VINYL, but since I wanted a RUSTIC LOOK, I didn't actually want the vinyl on my sign...I just used it as a STENCIL, taking out the actual letters & leaving the remaining vinyl...
My original "sign" was more of square & the scrap of wood I found was a rectangle, so I improvised & moved over the Loads & Loads of Fun & cut a quick circle out just for fun. 
(I'm sure you can figure it out, but I painted the CIRCLE 1st, let it dry & then laid everything else down, since I wanted the circle in the background)

and then pulled off the vinyl. Took it outside for one more quick sanding & I was done! I can't wait to hang it up!


 After finishing the sign & cleaning out the laundry room today, 
tomorrow I hope to find some storage bins for a shelf in my laundry room
& then I'm calling it DONE!


(at least my laundry room now looks good...from the OUTSIDE, with the door shut!)


Sunday, December 5, 2010

Brinton Elementary

10 years ago an Elementary School was named after my Grandpa & this past week we had the opportunity to go to the 10 year anniversary & celebrate the success of the school and my Grandfather's life.
I made a clock to donate to the school from our family & they were very grateful.
I used my "Make the Cut" software on my cricut NEW UPDATE: This program is not compatible with Cricut anymore, unless you already have it:( I'm so sad!!!But can still be purchased to use with the Silhouette, Gazelle & more! Check out my sidebar for the purchase link! & just imported their school logo directly in to my computer & it was so easy to cut it from vinyl and apply to the clock! You can do this with nearly ANY image!

Want to make a clock for someone you love for Christmas?
Did you know they sell "Table Rounds" at Home Depot that double great as CLOCK ROUNDS!?
Have fun creating! I'd love to feature any clocks you make, here on my blog...email to Staci at craftifyit@gmail.com !

Thursday, November 18, 2010

stop the CLOCK & be THANKFUL...


Is it just me, or are the days/weeks/months flying by a little too quickly?!?

I know this time of year is always BUSY with all of the holidays, but it seems like it is going EXTRA FAST this year!

 I just barely got all of my Halloween put away & I'm already worrying about getting all of my Christmas shopping done.

BUT...I am trying to stop and enjoy NOVEMBER too.
You know, the MONTH of Thankfulness.

It is one of my favorites, yet sometimes I feel like it gets squished in between Halloween and Christmas & we barely think about it, until we are downing Mashed Potatoes and gravy on Thanksgiving Day!


Well, as I'm working to savor this month of gratitude, I also have to be realistic and start THINKING about Christmas, so I'm not waiting until the last minute. 

Two of my good friends were thinking ahead & asked me to help them make CLOCKS for Christmas Gifts this year...I was HAPPY to take the TIME to help!

We spent the day, painting & sanding & eating & enjoying each other's company:)

Debbie ended up with this gorgeous white tin clock that I LOVE, that she made for her sister...

 And Janell made up 2 Arizona State University clocks for her son's bedrooms...
 I love the way they both turned out & bet her boys will love them!
 How did I cut the vinyl for these clocks? 
There is not a "College Logo" cartridge as far as I know. 

I used my FAVORITE SOFTWARE...
NEW UPDATE: This program is not compatible with Cricut:( I'm so sad! But is still available for purchase on my sidebar for use with Silhouette, Gazelle and others.
You can practically cut ANY IMAGE with this software & costs almost the same as 1 cartridge!
It works with Cricut, Craft ROBO, Silhouette & Gazelles!
*unfortunately it is not compatible with Mac Computers yet:( 

Thinking of purchasing? I think you DESERVE it as an early Christmas Gift to yourself!
Purchase through any Make the Cut link on my blog and I receive credit for your purchase & will be SO GRATEFUL!

Soon...you will be able to  google "ASU logos" & find this...

and import it into your program & cut the vinyl you need & create THIS...
Imagine the possibilities!
BUY TODAY!
It is currently on sale for $58.36, you save over $20 with this sale!

Now, that is something to be THANKFUL for;)

Photobucket

Tuesday, September 7, 2010

THANK YOU!!!


NEW UPDATE: This program is not compatible with Cricut:( I'm so sad!!!But can be purchased for use with your silhouette, Gazelle and others.
A couple months ago, I ordered MAKE THE CUT for my Cricut & have LOVED it!
Since then, I emailed them and am now an affiliate & can make a percentage of every sale IF
you order through any link on my blog!!


Well...some of you have ordered
& I want to say...

PS...I just recently found out that MTC is not compatible with Macs:( 
BUMMER.
I think they are working on it, but in the meantime, shoot them an email telling them YOU WANT THEM TO MAKE IT COMPATIBLE!


PSS. It is still on sale for $58.36, normally $80...so if you are thinking about it...I would get it now, I don't know how long this sale will last???


Photobucket

Tuesday, August 31, 2010

Preschool Prep


A cool feature on Make The Cut (for your Cricut) 
NEW UPDATE: This program is not compatible with Cricut:( I'm so sad!!! But can be used with your silhouette or gazelle & can be purchased through the link on my sidebar! is that you can lay out different fonts & sizes of lettering & then CUT all at the same time!


I needed a "Preschool" sign for my wall & cut out these letters on white cardstock...
Then using these frames I got at Goodwill, all for 99cents(ignore the purple one, I didn't use that)...
 I spray painted the frames red & glued the white letters onto black cardstock...
& created a unique PRESCHOOL SIGN for my wall...
 Wanna see this wall when we BOUGHT our house??
You would NEVER know that we drywalled right over that boarded up window & now that wall serves such an important part of my Preschool Classroom...

Happy Craftifying!
"Meet the Teacher" went GREAT today, wish me luck on my 1st day of School TOMORROW!!!


Photobucket

Friday, August 27, 2010

Make The Cut : Cricut Vinyl Tutorial


NEW UPDATE: This program is not compatible with Cricut:( I'm so sad!!! But can be used with Silhouette, Gazelle and others. 


I have been having a lot of fun using Make the Cut with my Cricut lately. 
I only own 2 cartridges( I know, sad)
so my cutting capabilities were limited...
UNTIL I purchased Make the Cut, about a month ago.
Now I can cut nearly ANYTHING!

Last night my brother came over, he wanted me to cut vinyl decals for some family member's vehicles(including his own), so we set to work "googling" for the image we wanted.
We found this logo, which is my dad's company...
shout of for Mesa, AZ! ;)
We SAVED the image to the computer(don't worry if it is a bit blurry like the image below, you can tweak the quality in Make the Cut, very cool!)

Now...open up Make The Cut.
make sure the setting is on your correct Mat Size & then 
click FILE
IMPORT
PIXEL TRACE
Now you can select ANY IMAGE on your computer...so search for your saved image that you want to cut & then click OPEN.
Now, you are in a screen where you can tweak the quality.
There are 4 things you can play around with...
the Threshold, Resample, Optimize & Smoothing.
Adjust the numbers until your image is just how you would like it!
Then click IMPORT
 & your image will appear on your "virtual cricut mat" in MTC, 
like this(i forgot to take a pic of this step on the mesa logo, but this is another logo I did for my brother's truck)...
Now you can play with the SIZE on your mat, add more words, 
to make it look how you want!
During this step for my Dad's "Visit Mesa" logo, 
I decided I didn't like the font of his logo website & I simply deleted it & added a new website in a new font & made it a bit bigger(we want people to be able to see it while he is driving)!
*You can use ANY TRUE TYPE FONT in Make the Cut!
 
Once everything is set in Make the Cut, hook up your cricut to your computer, using a USB cable(I just grab mine from my printer & hook it up to my cricut when I need it)
make sure your Cricut BLADE DEPTH is at 6
your PRESSURE is at LOW
and your SPEED is at LOW
then press CUT on your COMPUTER
(not on your cricut) & wait.
*these settings are the best I have found for VINYL. It will cut through your vinyl, but not the 2nd layer of paper!
Then peel off the "excess" vinyl that you don't want...leaving ONLY the logo you want.
Then I use contact paper that you can buy at Walmart for $5 for a big roll to transfer the image.
Just stick the contact paper onto the logo, 
& then peel off the back paper of the vinyl(the Blue part you see in my image above)
Now you have a "sticker" that you can place onto any surface...
smooth out the bubbles & then
peel off the contact paper, making sure your vinyl sticks to the surface & 
wah la!
Fun, huh!?

***thinking of buying Make the Cut!?
Now is a great time, as it is only sale for only $58.36 (normally $80) & you will save TONS in the long run, not buying cartridges! It is a SUMMER SALE, so I assume it won't last much longerl
AND...I am now an affiliate with Make the Cut, so I get a percentage of the sale if you purchase through my links in this post or through the button on the top right side of my sidebar... 
and I will LOVE you forever if you do!!!

I'm still learning, but if you have any Make the Cut questions, feel free to email me at 
craftifyit@gmail.com

THANKS!!!

Wednesday, August 18, 2010

Clock Designs with MTC


A few more clock designs...hope I am not boring you with them, but that is how I have been spending my "free" time lately!

 ------------------

I had a client ask for a RED clock with black numbers & said her son's room theme is Monster Trucks. 
I decided to use some black numbers I had to give a little bit of a 3-D look and glued them on...
but BEFORE gluing, I decided the clock needed "REAL" Monster Truck Tire Tracks, 
so I just rolled my son's toy truck wheels in paint & rolled across the wood...
After adding the numbers, I decided I wanted a MONSTER TRUCK in the center of the clock.
I wanted a simple outline of a truck, so after GOOGLING "Monster Trucks", I found this picture & imported it to my new MAKE THE CUT SOFTWARE for my Cricut, using "Pixel Trace"
NEW UPDATE: This program is not compatible with Cricut anymore:( I'm so sad!!! But can be purchased for use with Silhouette, Gazelle and others! 
It traces the image right into the program & then I used a "shadow" affect so it would cut a slightly larger on on black vinyl, as well as the image I wanted in white vinyl!
EASY PEASY!
I hope this particular 3 year old loves his new "Monster Truck" Clock!


Next up...

the same client had a request for a Baby Blue Clock with Brown Numbers for her baby Hudson & sent me this picture of his crib bedding...
 I loved the design on his sheets & googled "Circle Dots" & found this image & then just cropped out ONE of the circle designs & again imported it into my Make the Cut Program using Pixel Trace...
 I tweaked this one a bit & got a look that I was happy with & printed it in a few different styles/sizes...
And then CUT out of VINYL...
I found a font in MTC that I liked & printed 3" numbers for the clock as well, along with a 6" letter H for the center, since his name is Hudson & placed on an already spray painted, Chocolate Brown Round...
Wait!
Didn't I say that she wanted a BLUE CLOCK with BROWN NUMBERS?
Well, guess what? I didn't have any BROWN VINYL, so this was my way around it. 
I used the vinyl as a "  stencil"...
and then took it outside & spray painted it Baby Blue...
After it dried, I peeled the vinyl off & Wah-La...
Blue Clock with Brown Numbers!

Thinking about Purchasing Make The Cut???
It is on sale right now for $58.36!!!
It is normally $80, so that is a big savings.
Just click HERE
or 
on the button on my sidebar to order through ME & you will save a TON of money in the long run! (I will also love you forever & ever, as I'm now a Make the Cut affiliate!)

NEW UPDATE: This program is not compatible with Cricut:( I'm so sad!!!  But works with Gazelle, Silhouette and more!